It's time to get back to work on the client project. You can use
what you've learned about floats in this lesson to design the
narrow sidebar columns that the client wants on both sides of
the main content division.
As you learned in this lesson, floats apply only to subsequent
elements in the page source. In the client's layout, you want
leftcolumn and rightcolumn both to float next to the navbar and
main content divisions. So, it's important that the div tags in
the clientlayout.htm page be in the proper order for that. So,
go ahead and open your ClientSite folder. Then, open up the
clientlayout.htm file and make sure your div tags are in the
right order, as below.
<!DOCTYPE html PUBLIC "-//W3C//DTD XHTML 1.1//EN"

					"http://www.w3.org/TR/xhtml11/DTD/xhtml11.dtd">

					<html xmlns="http://www.w3.org/1999/xhtml">

					<head>

					   <title>Client Layout</title>

					   <link href="clientstyles.css" rel="stylesheet"
					type="text/css" />

					</head>

					<body>


					<div id="wrapper">


					<div id="branding">

					   branding

					</div><!-- End branding -->


					<div id="leftcolumn">

					   leftcolumn

					</div><!-- End leftcolumn -->


					<div id="rightcolumn">

					   rightcolumn

					</div><!-- End rightcolumn -->


					<div id="navbar">

					   navbar

					</div><!-- End navbar -->


					<div id="content">

					   content

					</div><!-- End content -->


					<div id="footer">

					   footer

					</div><!-- End footer -->


					</div><!-- End wrapper -->

					</body>

					</html>
Assuming the tags are all there and in the appropriate order,
you can close clientlayout.htm. There's no need to make any
other changes. The rest you'll do in the clientstyles.css file.
Here's the challenge. Your client wants the page background
(outside the wrapper) to be a blue-gray shade (#7E97A6). She'd
like about 20 pixels of that color to show through, even above
the branding bar.
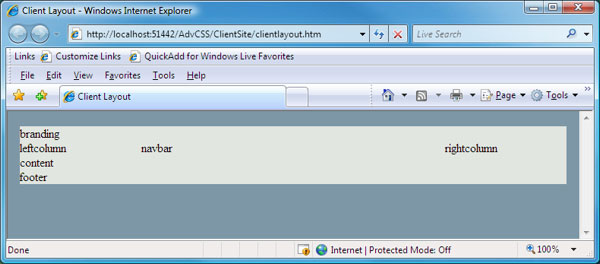
While you're in clientstyles.css, you might as well go ahead and
add the necessary style rules to make leftcolumn float to the
left of subsequent elements. You'll also need a style rule to
make rightcolumn float to the right of subsequent elements. Each
of them will need a specific width. For now, you can give each a
width of 10em. When you've finished, the clientlayout.htm should
look like the image below in your Web browser.
Client layout with some new styling
Don't know where to start? Here are some hints. They all apply
to the clientsyles.css file:
You need to change the margin descriptor in the #wrapper
style rule.
You need to add a style rule to make the page body the
darker blue color.
You need a leftcolumn style rule to give that column a
width and float it to the left.
You need a rightcolumn style rule to give that column a
width and float it to the right.
The clientstyles.css page with all the necessary changes and
additions is shown below. But try not to peek before you've
tried doing it on your own.
/* clientstyles.css */
/* Block all default margins and padding */
* {
margin:0;
padding:0;
}
body{
background-color:#7E97A6;
}
/* Wrapper contains the layout */
#wrapper{
width:45em;
margin: 20px auto 0 auto;
background-color:#E2E6E0;
}